Simply Sketched Saturday Challenge #16 Hang Your Stocking Die Cut Christmas Card


12118943_10153621897749463_5052811701636734808_n

Thank you for joining us for another Simply Sketched Saturday Challenge! We’re so excited to be sharing this hop with you. The products used are all available in the current Annual, or seasonal, Stampin’ Up!® Catalogues*. Simply use the buttons at the bottom of the post to keep hopping!

So today’s sketch is from the lovely Amanda…….

Amanda did a fabulous job with her sketch and I loved that she provided us with the inspiration photo behind her sketch. Once she did this I pictured my card straight away! I knew what stamp set and matching Thinlits Dies, mostly the Thinlits Dies, that I was going to use and I couldn’t wait to break out my Hang Your Stocking Thinlits Dies and Stamp Set!! This is available as a Bundle saving 10%.


I am quite the traditionalist when it comes to Christmas, I like reds, greens and gold’s. So my card base is a piece of Real Red A4 Cardstock cut at 5 7/8 inches and scored at 4 1/8 inches.  Using the large stocking Thinlit, I did some partial die cutting which left some of the stocking shape on the edge of my card front.

20161216_213741_edited_marked

I then made up my cute stockings using the patterned Thinlets in Real Red Cardstock and the base of my stocking and the trimmings die cut from some Gold Foil Sheet. I adhered these altogether first and then applied them to my card front with Multipurpose Liquid Glue, as I want to post this card and did not want too much dimension.

20161216_214058_edited_marked

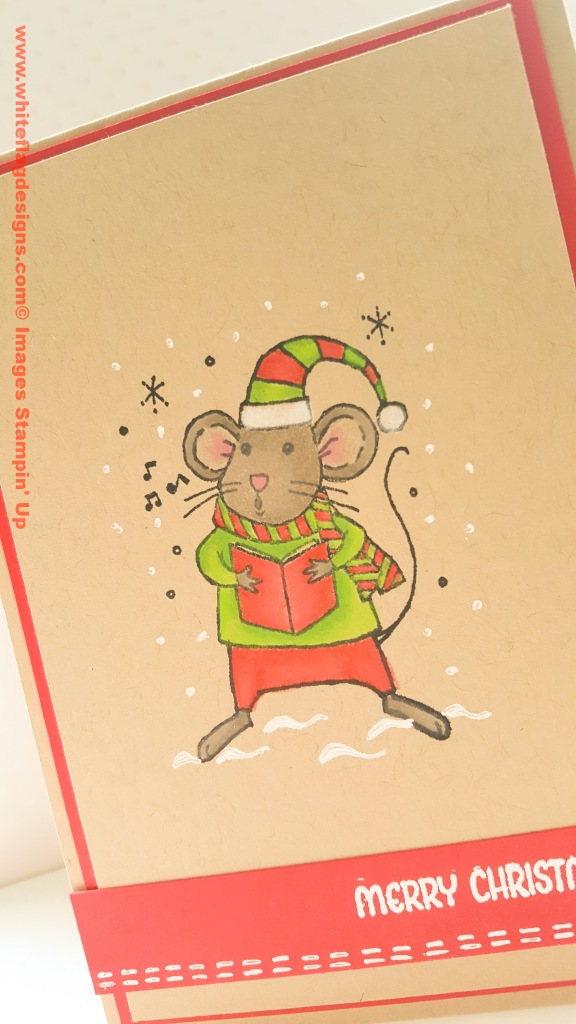
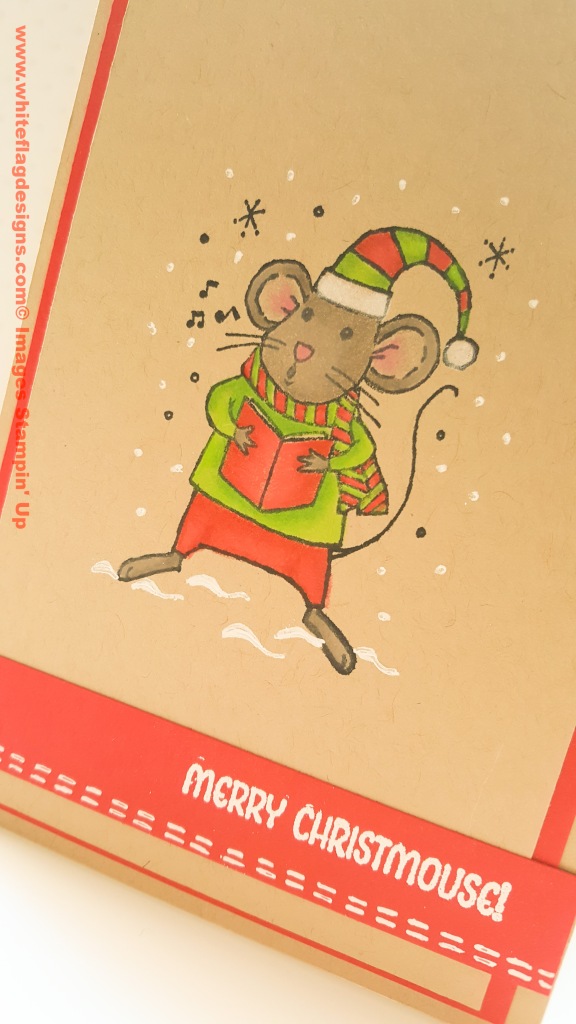
On my card base I stamped my sentiment, which I have to say I did not even notice when purchasing the stamp set but it is soooo pretty and embosses really well, in Versamark Ink and heat embossed with my heat tool and some Gold Stampin Emboss Powder. I also used two of the tiny snowflake images stamped randomly and also heat embossed for the rest of my card front.

20161216_214032_edited_marked


I have to say that this card really did not take long to make, in fact I was quite shocked at how quickly it came together and I really like it. I am planning on re-creating it some more colours, probably traditional but you never know so keep an eye out over on my Instagram page (link in the sidebar) for quick peeks!

This slideshow requires JavaScript.


Thank you for hopping by today don’t forget to hop along below and see what gorgeous projects everyone else has come up with for this month’s sketch, I have had a sneak peek at a couple and they are amazing so go check them out!!

Please subscribe to my blog for more inspiration or go check me out on Facebook , Instagram, Twitter or Pinterest (links to all my social media in the sidebar) I would love to see you there.

Wishing you and yours and very Merry Christmas and the Happiest of New Years, Louise xx

1947552_10153619905044463_6634224490510674762_n

12140657_10153619904944463_7478754229418831261_n

yearendcloseout_shareables_eng_5


Simply Sketched Saturday Challenge #14 Star of Light Christmas Card

12118943_10153621897749463_5052811701636734808_n

Thank you for joining us for another Simply Sketched Saturday Challenge! We’re so excited to be sharing this hop with you. The products used are all available in the current Annual, or seasonal, Stampin’ Up!® Catalogues*. Simply use the buttons at the bottom of the post to keep hopping!


So today’s sketch is from the lovely Sally Shaw from http://www.sallystampers.com

14520337_854184707568_4260323449115670211_n

I still find it amazing how differently everyone interprets a sketch and how no two projects are the same! Every time I see the different projects I think “how come I didn’t think of that?” So, I really wanted to up my game as there is some amazing talent in this blog hop so I put my thinking cap on and came up with these cards today. They are the same card just very slightly different. I have used the Star of Light Stamp Set and matching Starlight Thinlits Dies, which are available as a bundle HERE, saving you 10%. I also used two shades of A4 Cardstock, Soft Sky and Pool Party. Although in the pictures they barely look different, that is due to my terrible photography!

20161021_192019-1

To make my window card base I took a piece of A4 cardstock cut it at 4 1/8 inches and scored it at 5 7/8 inches. Once folded and burnished taking my Stampin’ Trimmer I cut off 2 3/4 inches off the front of my card. Using a piece of Window Sheet cut to 4 1/8inches x 3 inches and some Tear & Tape Adhesive I adhered this to the bottom half of my card front. From the stamp set I took the larger star pattern and stamped this on the top half of my card base in Versamark Ink and heat embossed with my heat tool and some White Stampin Emboss Powder.

20161021_221231-1

For the main star pieces I used several of the different elements in the thinlits set and die cut from some A4 Shimmery White Cardstock, matching Pool Party or Soft Sky cardstock and some Dazzling Diamonds Glimmer Paper. I adhered the three pieces together with some Multipurpose Liquid Glue. Before adding to my card front I adhered a strip of Dazzling Diamonds Glimmer paper (4 1/8 x 1/2 inch) with some Fast Fuse, as you can never have enough of this on a card! Then again adding Fast Fuse to the top half of my star I adhered it to my card front.

I stamped my sentiment on the inside of my card in the bottom left hand corner again in Versamark Ink and heat embossed as before. Finally as these card are not too dimensional and ideal for posting I decorated a couple of C6 Whisper White envelopes with some star images from the stamp set and co-ordinating Pool Party and Soft Sky Classic Ink.

I am really pleased with how these cards turned out and they are fairly simple to recreate and look very pretty! Don’t forget to hop along below and see what gorgeous projects everyone else has come up with for this month’s sketch!

This slideshow requires JavaScript.

Thank you for hopping by today don’t forget to subscribe to my blog for more inspiration or go check me out on Facebook , Instagram, Twitter or Pinterest (links to all my social media in the sidebar), Louise xx

1947552_10153619905044463_6634224490510674762_n

12140657_10153619904944463_7478754229418831261_n


Pootlers Blog Hop Merry Mice Christmas Card

bog hop-001Welcome to another Pootler’s Team Blog Hop! This blog hop is to showcase some of the gorgeous goodies in the seasonal Autumn & Winter Catalogue that was released on 1st September.

It’s no secret I love colouring with my Prismacolour pencils on our Crumb Cake Cardstock, I love the way the colours pop!! As soon as I saw the Merry Mice Stamp Set I knew I would be getting out my coloured pencils. I know it may feel a wee bit earlier for Christmas cards but last year I made all of my own and although I did get a head start I still ended up making dozens in a mad rush in the run up to the big day, so this year I am thinking “the earlier the better!”.

20160910_142844_marked_edited

I stamped my carol singing mouse in some Memento Tuxedo Black Ink on to my favourite Crumb Cake Cardstock (3 7/8 inches x 5 5/8 inches). I had so much fun colouring in my little mouse friend. I still need plenty of practice with my pencils but I love finding cute little images like this to use. I added some extra snow accents with a white gel pen.

20160910_142856_marked_edited

I popped my mouse card front on to a mat of Real Red Cardstock (4″ x 5 6/8 inches) and then on to a card base of Crumb Cake Cardstock with some of my favourite adhesive Fast Fuse (cut at 4 1/8 inches and scored at 5 7/8 inches). I stamped my sentiment in Versamark Ink on a strip of Real Red Cardstock and heat embossed with some White Stampin Up Emboss Powder. My sentiment was not completely central…ooops! so I rescued this by adding some white gel pen faux stitching and that is my first Christmas card for 2016 completed!!


This slideshow requires JavaScript.

Thank you for hopping by today, before you hop on to the lovely Anna don’t forget to subscribe to my blog and you won’t miss any of my future cards and projects xx

bog hop_2-001

bog hop_2_2-001

Product List

Merry Mice Clear-Mount Stamp Set

Merry Mice Clear-Mount Stamp Set

[142145]

£15.00

Crumb Cake A4 Card Stock

Crumb Cake A4 Card Stock

[121685]

£7.25

Tuxedo Black Memento Ink Pad

Tuxedo Black Memento Ink Pad

[132708]

£5.50

Real Red A4 Card Stock

Real Red A4 Card Stock

[106578]

£7.25

Versamark Pad

Versamark Pad

[102283]

£7.75

Embossing Buddy

Embossing Buddy

[103083]

£5.50

White Stampin' Emboss Powder

White Stampin’ Emboss Powder

[109132]

£4.50

Heat Tool - Uk Plug

Heat Tool – Uk Plug

[129054]

£27.00

Stampin' Trimmer

Stampin’ Trimmer

[129722]

£27.00

Simply Scored

Simply Scored

[122334]

£27.00

Bone Folder

Bone Folder

[102300]

£6.25

Pootler’s Design Team Balloon Builders Rainbow Birthday Card Week #5

13131041_10153500487306603_7349292774340075556_o

Welcome to the fourth week of June’s projects with the Pootler’s Design Team. As mentioned previously the stamp set for this months challenge is the Balloon Builders Stamp Set.

This week is a busy birthday week for me with some big birthdays happening so I wanted to make a bit of a special birthday card and I love making shaker cards! For this weeks card I got my colour inspiration from the Pop Of Pink Speciality Designer Series Paper, which I have finally broke into. I used a piece of the DSP (measuring 3 7/8 inches x 5 5/8inches) for my card front. For my card base I used some Basic Black A4 Cardstock (cut at 4 1/8 inches x 5 7/8 inches). I then adhered a piece of Melon Mambo A4 Cardstock (4 inches x 5 6/8 inches) with Fast Fuse Adhesive.

I took a piece of Whisper White A4 Cardstock (3 5/8 inches x 5 3/8 inches) and along with my piece of DSP I die cut two squares using the fabulous Layering Squares Framelit Dies. Using some Melon Mambo and Basic Black cardstock and the squares framelits I die cut two frames for my shaker windows, I adhered my DSP to my Whisper White piece and my frames to my windows. On the reverse I adhered some Window Sheet to my shaker windows and applied some of the super new Foam Adhesive Strip. On some more Whisper White I stamped two larger balloon images and two smaller balloon images from the stamp set in Melon Mambo Classic Ink, which I then punched out with the co-ordinating Balloon Bouquet Punch. I also punched out some balloons in Shimmery White Cardstock and some more Melon Mambo and Basic Black.

On my card base I adhered one smaller stamped and punched out balloon to each space where my shaker windows will be. I popped in some sequins from both the Metallics and Brights Sequin Mixes. I then popped on my card front. To the side of each shaker window I adhered a larger balloon punch out with some Tonbow Mono Multi Glue and popped up a larger stamped balloon image with some Stampin Dimensionals. To finish of my card front I stamped the Happy Birthday sentiment from the stamp set in some Versamark Ink on a smallpiece of Melon Mambo cardstock and heat embossed with some White Stampin Emboss Powder.  I cut this in to a flag end and popped it up with some dimensionals on to my card and of course covered everything in Wink of Stella. For the inside I just used a couple of the die cut pieces from my shaker windows and adhered these for a pop of colour.

I am very happy with how this card turned out and is pretty simple to recreate! Don’t forget to pop back next week to see what I come up with next!

This slideshow requires JavaScript.

Thank you for dropping by today and joining me  as part of the Pootler’s Design Team and don’t forget to subscribe to my blog for more inspiration or go check me out on Facebook or Instagram, Louise xx

Product List

Balloon Builders Photopolymer Stamp Set

Balloon Builders Photopolymer Stamp Set

[140645]

£14.00

Basic Black A4 Card Stock

Basic Black A4 Card Stock

[121688]

£7.25

Whisper White A4 Card Stock

Whisper White A4 Card Stock

[106549]

£8.25

Melon Mambo A4 Card Stock

Melon Mambo A4 Card Stock

[119980]

£7.25

Shimmery White A4 Card Stock

Shimmery White A4 Card Stock

[121717]

£7.25

Pop Of Pink Specialty Designer Series Paper

Pop Of Pink Specialty Designer Series Paper

[141648]

£11.75

Layering Squares Framelits Dies

Layering Squares Framelits Dies

[141708]

£32.00

Window Sheets

Window Sheets

[142314]

£4.50

Metallics Sequin Assortment

Metallics Sequin Assortment

[138390]

£4.50

Brights Sequin Assortment

Brights Sequin Assortment

[138389]

£4.50

Foam Adhesive Strips

Foam Adhesive Strips

[141825]

£7.25

Balloon Bouquet Punch

Balloon Bouquet Punch

[140609]

£16.00

Clear Wink Of Stella Glitter Brush

Clear Wink Of Stella Glitter Brush

[141897]

£7.25

Liquid Multipurpose Glue

Liquid Multipurpose Glue

[110755]

£3.75

Fast Fuse Adhesive

Fast Fuse Adhesive

[129026]

£9.00

Big Shot

Big Shot

[143263]

£99.00

Stampin' Dimensionals

Stampin’ Dimensionals

[104430]

£3.75

Embossing Buddy

Embossing Buddy

[103083]

£5.50

Versamark Pad

Versamark Pad

[102283]

£7.75

White Stampin' Emboss Powder

White Stampin’ Emboss Powder

[109132]

£4.50

Heat Tool - Uk Plug

Heat Tool – Uk Plug

[129054]

£27.00

Stampin' Trimmer

Stampin’ Trimmer

[129722]

£27.00

Paper Snips Scissors

Paper Snips Scissors

[103579]

£9.00

Simply Scored

Simply Scored

[122334]

£27.00

Bone Folder

Bone Folder

[102300]

£6.25


host-promo-header-SP-EU_rdax_574x177

June is an epic month for hostesses!! For each event a hostess has with 350 €/£250 or more in sales, that hostess will receive 35 €/£25 in Extra Stampin’ Rewards.

Recruiting_Header_Demo_May2416_ENG

That’s right! Every new recruit who joins my team this month will get two FREE stamp sets in their Starter Kit. That’s an added value of up to 126 €/£92, depending on which stamps you choose. It’s a pretty big deal since that’s the same month we launch the new catalogue and the new stamps inside it. Plus, anyone hosting an event with me in June can also get Extra Stampin’ Rewards, which can be used towards their Starter Kit. Have the stars aligned or what?

CM50200B

Simply Sketched Saturday Challenge #11 Barnyard Babies Little Lamb Baby Card

Thank you for joining us for another Simply Sketched Saturday Challenge! We’re so excited to be sharing this hop with you. The products used are all available in the current Annual, or seasonal, Stampin’ Up!® Catalogues*. Simply use the buttons at the bottom of the post to keep hopping!

So today’s sketch is from the lovely Keren Howell….

Okay so today’s card was an easy one for me as we have a new baby in our family! This card is for the very lucky and very proud Grand-parents. I decided to go for Flirty Flamingo A4 Cardstock (cut at 4 1/8 inches and scored at 5 7/8 inches), this is fast becoming my favourite Pink in the colour families. I stamped the Little Lamb (sooooo cute!!!) image from the Barnyard Babies Stamp Set on to some A4 Shimmery White Cardstock in Basic Black Archival Ink. I love this cardstock, it is becoming a go to basic for me.

Taking my Flirty Flamingo Classic Ink and Smoky Slate Classic Ink I water coloured my image and out aside to dry. Then, with a piece of A4 Vellum (cut to 2 1/2 inches x 5 7/8 inches) I stamped the little lamb image in Versamark Ink and heat embossed with White Stampin Emboss Powder. I adhered this to my card base with some Multipurpose Liquid Glue.

I punched out my little lamb with my 2 inch Circle Punch and popped it on my card front with some Stampin Dimensionals. Taking some more Shimmery White cardstock I stamped my sentiment in Flirty Flamingo ink  and punched it out using the new label punch. I also punched out a label from some more Flirty Flamingo cardstock and adhered these together with some multipurpose liquid glue and popped this up on my card base. To finishmy card off I added some Basic Pearls.

I am very happy with how this card turned out and it is so simple and quick to recreate! Don’t forget to hop along and see how everyone else got along with this month’s sketch!

This slideshow requires JavaScript.

Thank you for hopping by today don’t forget to subscribe to my blog for more inspiration or go check me out on Facebook or Instagram, Louise xx

1947552_10153619905044463_6634224490510674762_n


12140657_10153619904944463_7478754229418831261_nProduct List


host-promo-header-SP-EU_rdax_574x177

June is an epic month for hostesses!! For each event a hostess has with 350 €/£250 or more in sales, that hostess will receive 35 €/£25 in Extra Stampin’ Rewards.

Recruiting_Header_Demo_May2416_ENG

That’s right! Every new recruit who joins my team this month will get two FREE stamp sets in their Starter Kit. That’s an added value of up to 126 €/£92, depending on which stamps you choose. It’s a pretty big deal since that’s the same month we launch the new catalogue and the new stamps inside it. Plus, anyone hosting an event with me in June can also get Extra Stampin’ Rewards, which can be used towards their Starter Kit. Have the stars aligned or what?

CM50200B

Pootler’s Design Team Balloon Builders Birthday Shaker Card Week #4

13131041_10153500487306603_7349292774340075556_o

Welcome to the fourth week of June’s projects with the Pootler’s Design Team. As mentioned previously the stamp set for this months challenge is the Balloon Builders Stamp Set.

This week is a busy birthday week for me with some big birthdays happening so I wanted to make a bit of a special birthday card and I love making shaker cards! For this weeks card I got my colour inspiration from the Pop Of Pink Speciality Designer Series Paper, which I have finally broke into. I used a piece of the DSP (measuring 3 7/8 inches x 5 5/8inches) for my card front. For my card base I used some Basic Black A4 Cardstock (cut at 4 1/8 inches x 5 7/8 inches). I then adhered a piece of Melon Mambo A4 Cardstock (4 inches x 5 6/8 inches) with Fast Fuse Adhesive.

I took a piece of Whisper White A4 Cardstock (3 5/8 inches x 5 3/8 inches) and along with my piece of DSP I die cut two squares using the fabulous Layering Squares Framelit Dies. Using some Melon Mambo and Basic Black cardstock and the squares framelits I die cut two frames for my shaker windows, I adhered my DSP to my Whisper White piece and my frames to my windows. On the reverse I adhered some Window Sheet to my shaker windows and applied some of the super new Foam Adhesive Strip. On some more Whisper White I stamped two larger balloon images and two smaller balloon images from the stamp set in Melon Mambo Classic Ink, which I then punched out with the co-ordinating Balloon Bouquet Punch. I also punched out some balloons in Shimmery White Cardstock and some more Melon Mambo and Basic Black.

On my card base I adhered one smaller stamped and punched out balloon to each space where my shaker windows will be. I popped in some sequins from both the Metallics and Brights Sequin Mixes. I then popped on my card front. To the side of each shaker window I adhered a larger balloon punch out with some Tonbow Mono Multi Glue and popped up a larger stamped balloon image with some Stampin Dimensionals. To finish of my card front I stamped the Happy Birthday sentiment from the stamp set in some Versamark Ink on a smallpiece of Melon Mambo cardstock and heat embossed with some White Stampin Emboss Powder.  I cut this in to a flag end and popped it up with some dimensionals on to my card and of course covered everything in Wink of Stella. For the inside I just used a couple of the die cut pieces from my shaker windows and adhered these for a pop of colour.

I am very happy with how this card turned out and is pretty simple to recreate! Don’t forget to pop back next week to see what I come up with next!

This slideshow requires JavaScript.

Thank you for dropping by today and joining me  as part of the Pootler’s Design Team and don’t forget to subscribe to my blog for more inspiration or go check me out on Facebook or Instagram, Louise xx

Product List


host-promo-header-SP-EU_rdax_574x177

June is an epic month for hostesses!! For each event a hostess has with 350 €/£250 or more in sales, that hostess will receive 35 €/£25 in Extra Stampin’ Rewards.

Recruiting_Header_Demo_May2416_ENG

That’s right! Every new recruit who joins my team this month will get two FREE stamp sets in their Starter Kit. That’s an added value of up to 126 €/£92, depending on which stamps you choose. It’s a pretty big deal since that’s the same month we launch the new catalogue and the new stamps inside it. Plus, anyone hosting an event with me in June can also get Extra Stampin’ Rewards, which can be used towards their Starter Kit. Have the stars aligned or what?

CM50200B

Pootler’s New Catalogue Blog Hop Summer 2016

Welcome to another Pootler’s Team Blog Hop!! This blog hop is all about the yumminess that is the new 2016-2017 Annual Catalogue. I can not believe how quick the year has gone, yes we saw some of our favourites retired but I have to say I LOVE the products in this catalogue…..do I have a wish list?…..no I just want it all! Anyway my project focuses on my favourite stamp set.

I know it is ADORABLE!! We spotted the Love You Lots Stamp Set when we were given a sneak peek at the new catalogue back in April at On Stage Live. Thankfully it was available in the pre-order (two excellent reasons to become a SU Demonstrator right there), so I snapped it up and couldn’t wait to make these cards with it.

So taking four pieces of A4 Whisper White Shimmery Cardstock (3 3/4 inches x 5 7/8 inches) I stamped all four of the adorable images in the stamp set in Archival Basic Black Ink. I then did some very simple and quick water colouring using Smoky Slate, Cucumber Crush, Real Red, Tip Top Taupe and Marina Mist Classic Inks. Whilst this dried I made my card bases from Real Red, Cucumber Crush, Basic Grey and Tip Top Taupe A4 Cardstock (cut at 4 1/8 inches and scored at 5 7/8 inches).

Before adhering my card front I cut a strip ( 1 1/2 inches x 5 7/8 inches) of co-ordinating DSP from the Designer Series Paper Stacks (In Colours 2015-2017, Neutrals and Brights Collections). I adhered this to my card base with some Fast Fuse Adhesive and popped up my card front on some Stampin’ Dimensionals.

20160617_205542

To finish off my cards I took another strip of matching cardstock (1 inch x 3 inches) and heat embossed each of the sentiments in White Stampin Emboss Powder and adhered these to my cards. I stamped the little thought bubble sentiment on my little frog card along with drawing a couple of mini red hearts with my Real Red Stampin Write Marker.

Thank you for hopping by today and joining us on the Pootler’s Blog Hop, don’t forget to subscribe to my blog for more inspiration or go check me out on Facebook or Instagram, now off to the next stop on the hop, Karen Taylor or if you are going backwards you will be off to see Fiona, enjoy the rest of your day Louise xx

bog hop_2-001

bog hop_2_2-001

Product List

host-promo-header-SP-EU_rdax_574x177

June is an epic month for hostesses!! For each event a hostess has with 350 €/£250 or more in sales, that hostess will receive 35 €/£25 in Extra Stampin’ Rewards.

Recruiting_Header_Demo_May2416_ENG

That’s right! Every new recruit who joins my team this month will get two FREE stamp sets in their Starter Kit. That’s an added value of up to 126 €/£92, depending on which stamps you choose. It’s a pretty big deal since that’s the same month we launch the new catalogue and the new stamps inside it. Plus, anyone hosting an event with me in June can also get Extra Stampin’ Rewards, which can be used towards their Starter Kit. Have the stars aligned or what?

CM50200B

Pootler’s Design Team Balloon Builders Birthday Celebration Week #3

13131041_10153500487306603_7349292774340075556_o

Welcome to the third week of June’s projects with the Pootler’s Design Team. As mentioned last week we will be using the Balloon Builders Stamp Set.

This weeks card is based on the reason I wanted this stamp set in the first place, “Sweets”, yes sweets!! I have seen a couple of examples of cards using the smaller balloon shapes in the set and they reminded me of jelly beans. So my card this week is a sweetie card, and no not all my cards on based on sweet treats.

I stamped three of the smaller balloon images in my three favourite colours, Daffodil Delight, Melon Mambo and Tempting Turquoise Classic Inks, on to a sheet of A4 Whisper White Cardstock. Creating a sheet of my own DSP, once dry I used my Clear Wink of Stella Brush Pen to add a bit of sparkle to my sweeties. I then trimmed this down to card fronts (3 7/8 inches x 5 5/8 inches) and a adhered them to a card base of Melon Mambo and Tempting Turquoise A4 Cardstock (cut at 4 1/8 inches and scored at 5 7/8 inches).

I took some A4 Vellum Cardstock and stamped a “Happy Birthday” sentiment from the Confetti Celebration Stamp Set in Versamark Ink and heat embossed this with White Stampin Embossing Powder. I then flipped this over and on the backside I coloured my sentiment in with the co-ordinating Stampin Write Markers. I cut a banner shape at the bottom and then adhered this to my card front using some discreet Glue Dots and Fast Fuse. Finally I added a piece of Whisper White Thick Bakers Twine to finish off my card.

I think you will agree this is a bright, fun and sweet birthday card!? Don’t forget to pop back next week to see what I come up with next!

This slideshow requires JavaScript.

Thank you for dropping by today and joining me  as part of the Pootler’s Design Team and don’t forget to subscribe to my blog for more inspiration or go check me out on Facebook or Instagram, Louise xx

Product List

host-promo-header-SP-EU_rdax_574x177

June is an epic month for hostesses!! For each event a hostess has with 350 €/£250 or more in sales, that hostess will receive 35 €/£25 in Extra Stampin’ Rewards.

Recruiting_Header_Demo_May2416_ENG

That’s right! Every new recruit who joins my team this month will get two FREE stamp sets in their Starter Kit. That’s an added value of up to 126 €/£92, depending on which stamps you choose. It’s a pretty big deal since that’s the same month we launch the new catalogue and the new stamps inside it. Plus, anyone hosting an event with me in June can also get Extra Stampin’ Rewards, which can be used towards their Starter Kit. Have the stars aligned or what?

CM50200B

Pootler’s Design Team Balloon Builders Week #2

13131041_10153500487306603_7349292774340075556_o

Welcome to the second week of June’s projects with the Pootler’s Design Team. As mentioned last week we will be using the Balloon Builders Stamp Set.

I used some Sweet Sugarplum A4 Cardstock for my card base (4 1/8 inches x 5 7/8 inches). I added a piece of the gorgeous New Playful Palette Designer Series Paper Stack  (3 7/8 inches x 5 5/8 inches) to my card base. Then taking a piece of Very Vanilla Cardstock  (3 1/4 inches x 3 1/2 inches) and the smallest little balloon stamp and Sweet Sugarplum Classic Ink and Blushing Bride Classic Ink, I stamped my little cute Macaron’s stacked on top of one another.

I finished my Very Vanilla piece off with some faux stitching in my Sweet Sugarplum Stampin Write Marker and my stamped sentiment again in Sweet Sugarplum Ink which I heat embossed with Clear Stampin Emboss Powder.

I popped this piece up on Stampin’ Dimensionals and to finish off I wrapped some of the beautiful Ruched Ribbon in Sweet Sugarplum.

That’s my project for this week don’t forget to pop back next week to see what I come up with next!

This slideshow requires JavaScript.

Thank you for dropping by today and joining me  as part of the Pootler’s Design Team and don’t forget to subscribe to my blog for more inspiration or go check me out on Facebook or Instagram, Louise xx

Product List

host-promo-header-SP-EU_rdax_574x177

June is an epic month for hostesses!! For each event a hostess has with 350 €/£250 or more in sales, that hostess will receive 35 €/£25 in Extra Stampin’ Rewards.

Recruiting_Header_Demo_May2416_ENG

That’s right! Every new recruit who joins my team this month will get two FREE stamp sets in their Starter Kit. That’s an added value of up to 126 €/£92, depending on which stamps you choose. It’s a pretty big deal since that’s the same month we launch the new catalogue and the new stamps inside it. Plus, anyone hosting an event with me in June can also get Extra Stampin’ Rewards, which can be used towards their Starter Kit. Have the stars aligned or what?

CM50200B

Pootler’s Design Team Balloon Builders Week #1

13131041_10153500487306603_7349292774340075556_o20160531_191736_001_marked

I am thrilled to tell you that I am taking part in the Pootler’s Design Team Challenge this month! Myself and four of my fellow Pootler’s will be creating a project every Thursday through June using the same stamp set sent to us by none other than the lovely Pootles herself!

20160531_191834_marked

So this month’s stamp set is the Balloon Builders set. To be honest this stamp set had crept past me in the catalogue but after a lovely swap I was given at Onstage Telford and seeing some fun projects on Pinterest it made its way on to my wish list, so I was super excited when I received it from Sam, happy days!!

20160531_191858_marked

For this weeks project and with the launch of our brand new catalogue yesterday I decided to also showcase the gorgeous new In Colours 2016-18 by creating a set of birthday cards stamped in our new colours along with the co-ordinating cardstock and absolutely gorgeous Ruched Ribbon.

20160531_191910_marked

Taking five pieces of Whisper White A4 Cardstock (3 7/8 inches x 5 5/8 inches) I stamped the main larger balloon image in each of the new In Colours across my Whisper White piece, firstly 1st generation stamping and then 2nd generation stamping and so on.

20160531_191919_marked

Then using the Happy Birthday sentiment, which fits snugly in the balloon shape, I stamped the darker balloons using Versamark Ink and heat embossed with White Stampin Embossing Powder on the Emerald Green and Dapper Denim pieces and the others in Silver Stampin Embossing Powder.

20160531_191928_marked

Breaking out my new In Colour 2016-18 Stampin Write Markers I drew on some strings for my balloons. Using some more new goodies I wrapped a piece of Ruched Ribbon around my card front and tied it in a bow (sort of). I then adhered this to my card bases in each of the new In Colours with Stampin Dimensionals.

This slideshow requires JavaScript.

Thank you for dropping by today and joining me  as part of the Pootler’s Design Team and don’t forget to subscribe to my blog for more inspiration or go check me out on Facebook or Instagram, Louise xx

host-promo-header-SP-EU_rdax_574x177

June is an epic month for hostesses!! For each event a hostess has with 350 €/£250 or more in sales, that hostess will receive 35 €/£25 in Extra Stampin’ Rewards.

Recruiting_Header_Demo_May2416_ENG

That’s right! Every new recruit who joins my team this month will get two FREE stamp sets in their Starter Kit. That’s an added value of up to 126 €/£92, depending on which stamps you choose. It’s a pretty big deal since that’s the same month we launch the new catalogue and the new stamps inside it. Plus, anyone hosting an event with me in June can also get Extra Stampin’ Rewards, which can be used towards their Starter Kit. Have the stars aligned or what?

CM50200B